Lesson Plans for Elementary School Students
Art Lesson Plan: Print-Making Card Designs

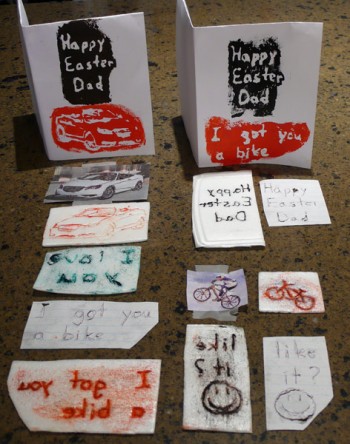
Here’s a great idea for easy print-making designs using pictures from magazines, pencils, and clean, washed styrofoam trays. These easy to do prints make it easy to create beautiful greeting cards for birthdays, Mother’s Day, Father’s Day, Grandparents Day, Valentine’s Day, Christmas, Easter, as well as invitations for birthday, Valentine and Hallowe’en parties.

Objectives:
- reusing clean styrofoam trays
- making greeting cards or making invitations
- tracing
- learning print making
- making stamps
- learn about mirror images
- learning about various artists (relate to Leonardo da Vinci and his note taking…see below lesson)

Materials:
- styrofoam trays (clean, washed, reused from meat purchase)
- oil paint
- brayer or roller or brushes
- 8 1/2″ X 11″ white paper, folded into 4 like a card
- old magazines, grocery flyers, to cut out illustrations for card
- scissors
- pencils
- scotch tape or masking tape
- White-out correction fluid (optional)
- if students wish to write in mirror image: Q-tips and mirror (see notes on Leonardo below lesson)
Method:
- Student looks through magazines or papers to cut out Easter pictures (or appropriate picture for the holiday you’re celebrating).
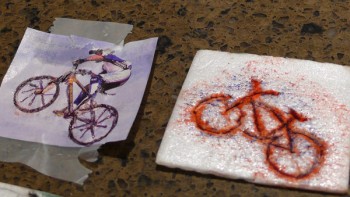
- Student tapes picture on top of piece of styrofoam, then traces the picture, pressing fairly hard with their pencil so that they will make an imprint in the styrofoam. Older students can draw freehand.
- Younger students can print out their message, such as “Happy Easter Mom and Dad. Love Sally” on a piece of paper, then instruct students to flip over their message and trace it on the back side. They can do this against the window or up to a light. Show students how their printing will be mirror image once it is pressed onto their card. Once their message is traced (on back side), they can tape it to another piece of styrofoam and trace it (mirror image) onto the styrofoam.
- Tell students about Leonardo da Vinci (see below for notes on his mirror image note taking).
- Once the picture (or message) is traced, remove the picture (or message) from the styrofoam.
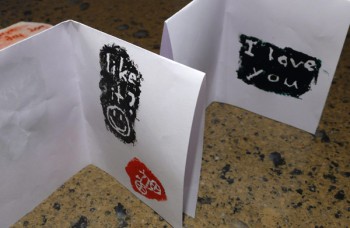
- Use the paint and brayer to roll paint onto the styrofoam stamp (or just put some paint on the styrofoam with a brush). Students then press the painted styrofoam stamp onto their card, rubbing their hand over the styrofoam stamp so that the paint will transfer over to the card. **Have students open the folded card and figure out where the styrofoam stamp will go on the inside page (and the correct direction to place the styrofoam stamp), then have students OPEN the card and press on the correct inside page. (***If student has worked very hard on making his card and accidentally smears a word or a word cannot be read, the White-out correction fluid can be used to make the word easier to read. I have only used it once. )
- These cards are easy for even the youngest students to make and they always turn out beautifully. Adults are amazed at the great cards.
Leonardo da Vinci
April 15, 1452 – May 2, 1519
1. left handed
2. Renaissance man, Leonardo di Ser Piero da Vinci, born Anchiano, Florence, Italy, died at 67 in France.
3. smart, excellent at arithmetic, always drawing, apprenticed as artist with Verrocchio in Florence and became a first-class geometrician.
4. had kindness, generosity, well-loved by friends, great conversationalist, handsome, persuasive, physically strong, generous (fed all his friends), wrote fables about placing too high esteem upon yourself and benefits to be gained through awareness, humility and endeavour (working hard).
5. wrote in mirror image (some thought to keep his notes secret or to keep from getting in trouble with the church for his radical ideas, but probably because he was left handed and did not want to smear his writing (have students try dipping a Q-tip in paint and practise writing in mirror image. Have mirror handy or check reflection in the classroom window. Great fun.)
Tags: birthday, christmas, Easter, famous artists, Father's Day, Grandparents Day, greeting cards, Halloween, holiday ideas, left-handed, mirror image, Mother's Day, party invitations, Valentine's Day
